Pods
Managing pods (vdesks and flexidesks)
After logging into the portal, administrators will see the following menu items:

The Servers item will only show if you are hosting your pods and servers on the Inevidesk platform, and the administrator has Company Server admin privileges.
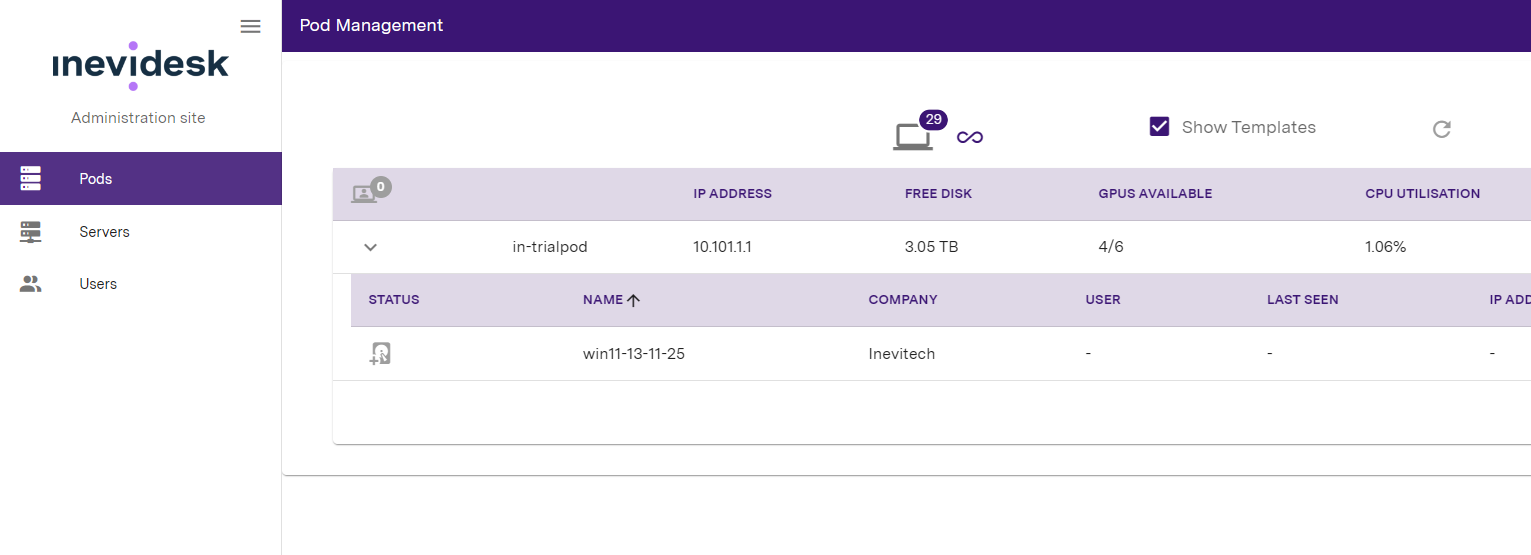
When the Pods item has been selected, you will see a list of your Company’s pods:

Clicking on the left-hand arrow will show a list of vdesks and flexidesks (see service descriptions below) if any exist:

If needed, you can export a spreadsheet file containing all of your pods, vdesks and/or flexidesks using the icon.
Clicking the icon will generate and download the file to your device.
The results in the report are based on what is (or isn't) being searched using the search bar. If you run a search and click the export icon only items matching that search will be shown in the report. Otherwise, all items will be shown by default.
Pod information
The portal shows general information to help you check on the resources of that specific pod:

In the dropdown list of vdesks, you will also be able to see which User has been assigned to each vdesk, when the vdesk was last ‘seen’ by the portal (this should be within the last minute or so otherwise it denotes a problem), its IP address and its uptime (this refers to the underlying virtual desktop and will not reflect reboots of the Windows machine).
If the vdesk is not showing a ‘Last Seen’ time within the last minute, this means that it is not checking in to the admin portal. This is usually rectified by a reboot of the vdesk.
Pod specification
The info tooltip helps you confirm the specification of a given pod.
Hover over the icon to show the model of a pod's motherboard; CPU, GPUs, and it's memory (RAM) and storage (SSD) resources.
It also displays the RAID level - the current storage configuration for the pod.
Intelligent Platform Management Interface (IPMI)
You can view the IPMI status for a given pod by hovering over the IPMI icon .
The tooltip will state whether IPMI has been configured and the current power state of the pod.
The icons are also colour-coded to reflect the possible states below:
-
: IPMI Configured
IPMI is configured and can be used for remote pod power control if required.
-
: IPMI Communication Error
IPMI is configured but cannot be accessed from other pods. Please check network settings and/or connectivity.
-
: IPMI Configured / Power state: Unknown
This will show if the portal cannot confirm a definitive power state for the pod.
This will typically be the case if you only have a single, on-premise pod or if all of the other pods in your estate are offline. -
: IPMI Not Configured
IPMI is not configured and remote power control is not possible.
IPMI allows the Inevidesk support team to connect to a pod for monitoring and support purposes. We strongly encourage you to dedicate a connection into this port if you haven't already.
Pod power control
You can shutdown or reboot your Inevidesk pods remotely via the following icons:
- Remote shutdown
This button is colour-coded according to the current state it is in (on / off). It will show if the pod is already powered off.
- Remote reboot
Remote Shutdown requires physical access or IPMI connection to power back on, with two caveats:
-
IPMI can only be used to power the pod back on if you have another pod that's already online.
-
If all pods are powered off the only way to power them all back on is to do so manually.
Pod task logs
You can view the history of tasks by clicking on the Pod Tasks icon .
Here you can see previous tasks, who ran them and if there were any errors.
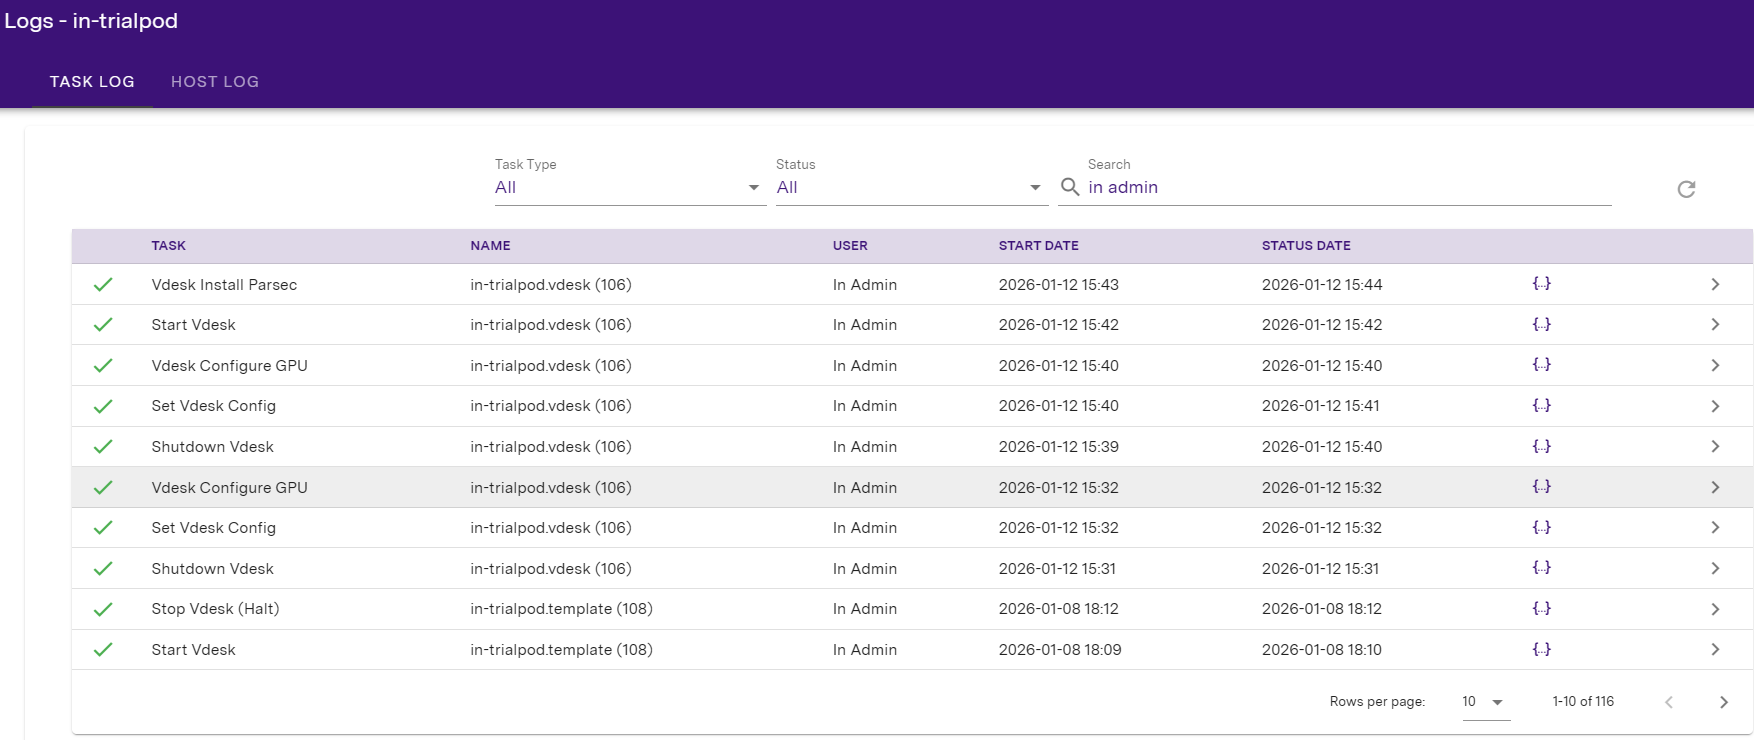
NOTE: If there is an error during vdesk creation, you will need to delete the broken vdesk and start again.
Initial deployment
Once logged in, the first thing you need to do is create your bespoke company template from a Windows 11 base template.
To do this go to the Pods menu item and click the Show Templates checkbox and click on the relevant template.
The following window will appear, please select: Create new template, add local Windows administrator, select a GPU and fill out all other details as required.
It is very important that you set and keep track of your local Windows administrator credentials.
You can set vCPU and Memory when cloning a vdesk. By default, it will use the values set by the template.
Ensure you liaise with your IT system administrator if you are unsure about any settings.
Toggle “Start vdesk when Completed” if you’d like to start the vdesk as soon as it’s been created.
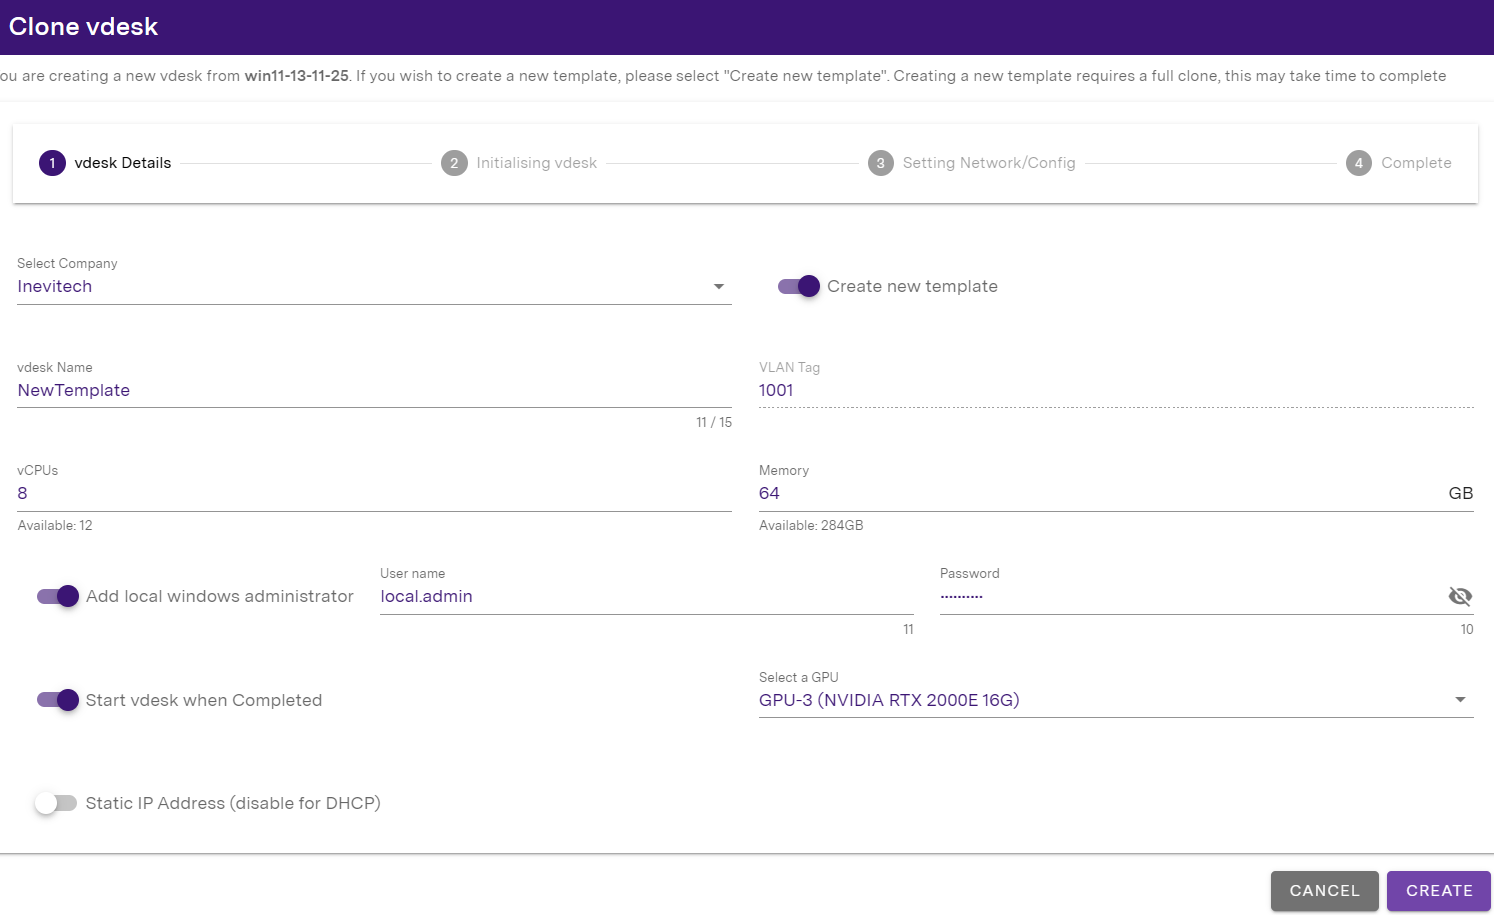
Click Create and wait for the template vdesk to be created.
Then assign your admin user to the vdesk by clicking the Access Control button.

If you haven’t started the vdesk through the cloning wizard you can do so manually by clicking on the vdesk, and then clicking the Start button at the bottom of the vdesk config/control popup.

Once the vdesk has booted, if you are Parsec premium connection customer please click on the Access Control button again, and add the “Parsec” Access Method.
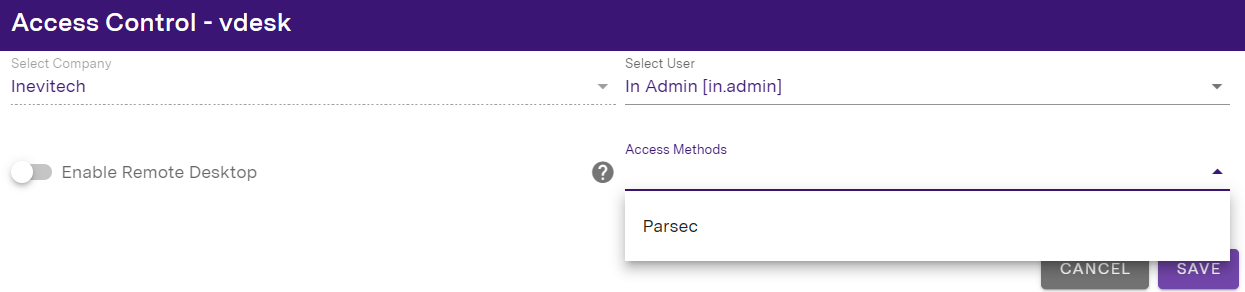
When you first add Parsec and click Save, the dot indicator next to Parsec will be amber - meaning Parsec is installing.
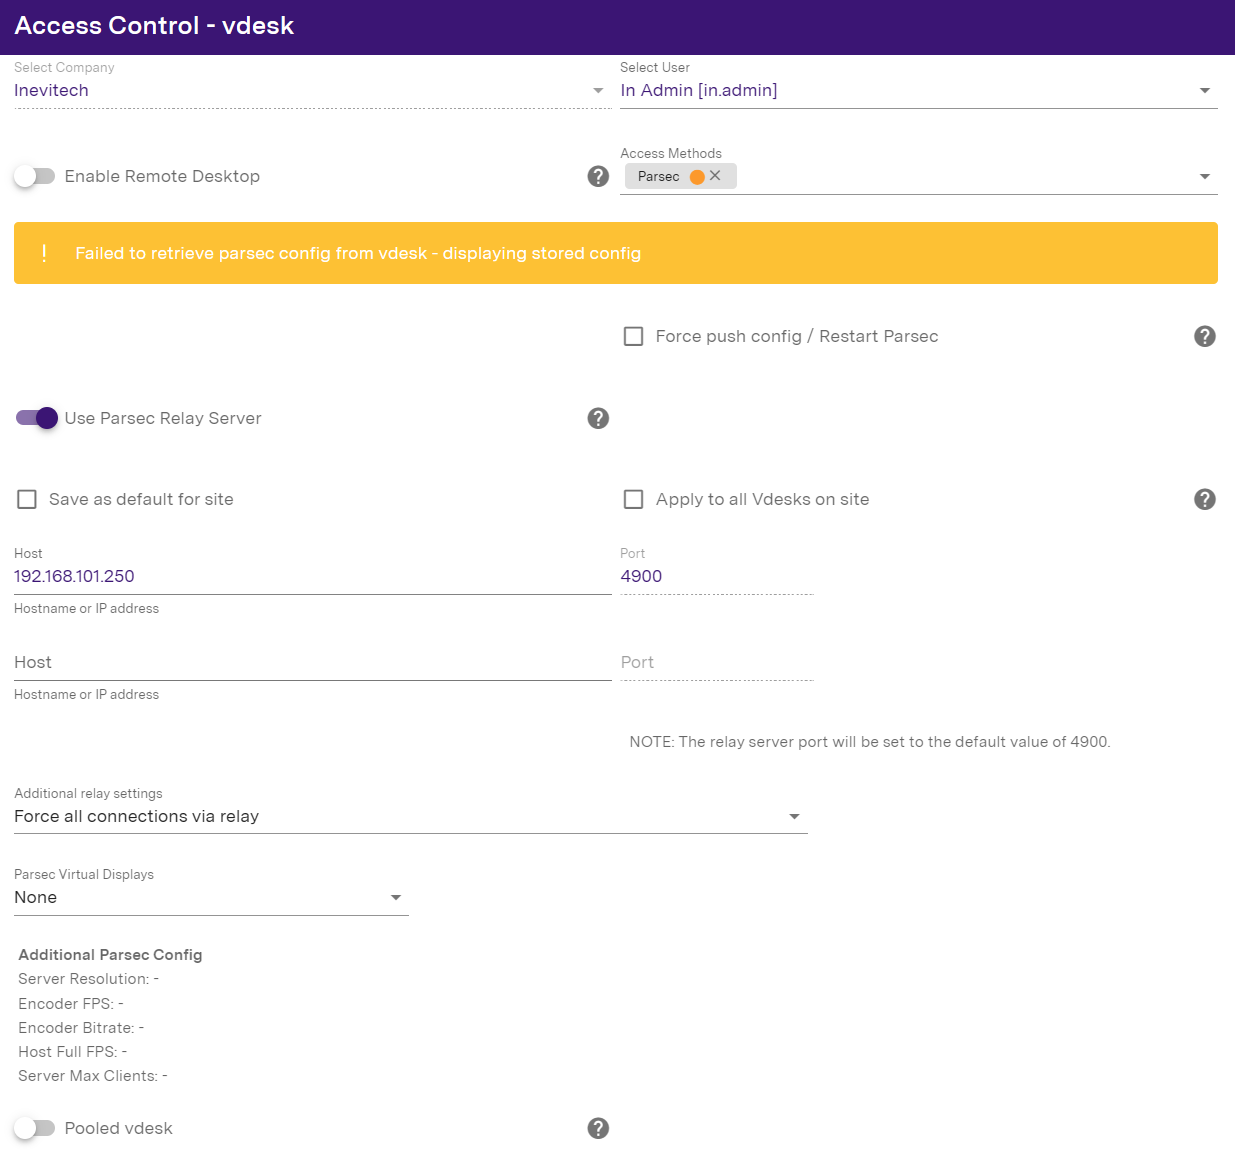
Once it has changed to a green dot with a tick Parsec has been successfully installed and registered on the vdesk. If this ever shows as red, it means Parsec cannot connect.

You should now be able to connect to the vdesk (via the Inevidesk desktop client or your preferred means of connection if not using Parsec) and install any applications that you want to have on your template.
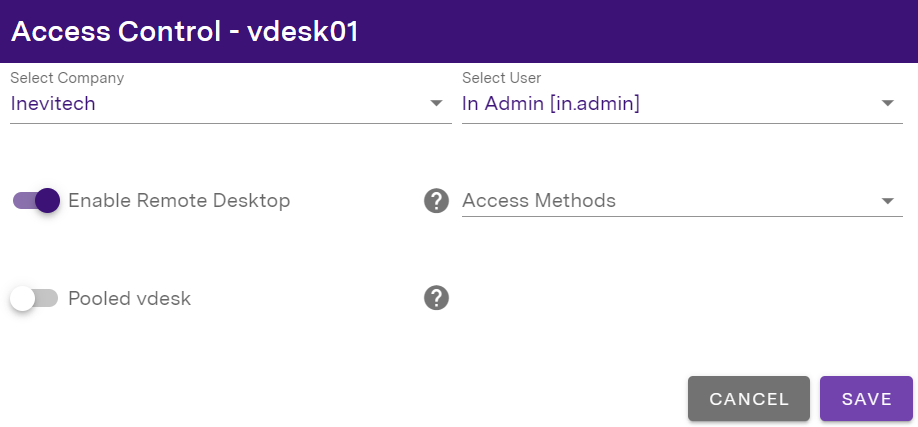
If you're not using Parsec, please make sure that you enable RDP via Access Control:
You can then install your preferred remote access tool over RDP or continue using RDP itself to connect to the vdesk. If you do not enable RDP, you will have to install your remote access tool on the vdesk in maintenance mode.
Do not add the template vdesk to your Windows domain. This should be done on each individual vdesk once created from the template.
Be sure to disable sleep and hibernation settings in the template - vdesks should never be in sleep/ hibernation mode.
Once you are sure you have installed all of the applications you require on your vdesks it is time to convert the template vdesk into an actual template. To do this, leave it running and click on the Convert vdesk to template button.
You cannot reverse this action, so ensure you are ready before proceeding. Once a vdesk is created you will need to add any additional software to it directly or destroy it and create a new vdesk from an updated template. See below on how to do this and preserve user profiles with Microsoft’s fslogix.

Once the template conversion process has completed, it will show as a template on the pod:

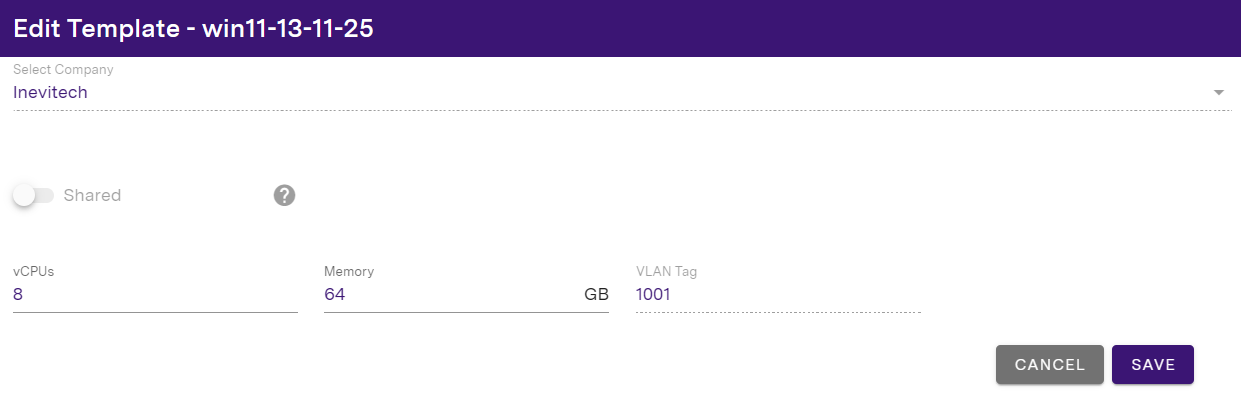
You can edit the resources on a template using the “Edit Template” button:

This will open up the “Edit Template” menu, where you can set the default vCPU and Memory resources available to vdesks created from that template. You can also set the VLAN tag for those vdesks if you are an on-premises client and want to use VLANs.
Suppose you are reusing templates between pods of differing specifications. In that case, you should use the Edit Template feature to ensure the templates’ default vCPU/Memory values correspond to the available resources for a given pod.
vdesk creation / deletion
Now that you have a template, you can create your first vdesk! Click on the template and fill the form with the details required then click Create.
If you want to add the vdesks to your windows domain during creation, then please select the Join vdesks to Active Directory slider and add the appropriate domain information. Otherwise, this can be done manually after the vdesk has been created inside Windows itself.
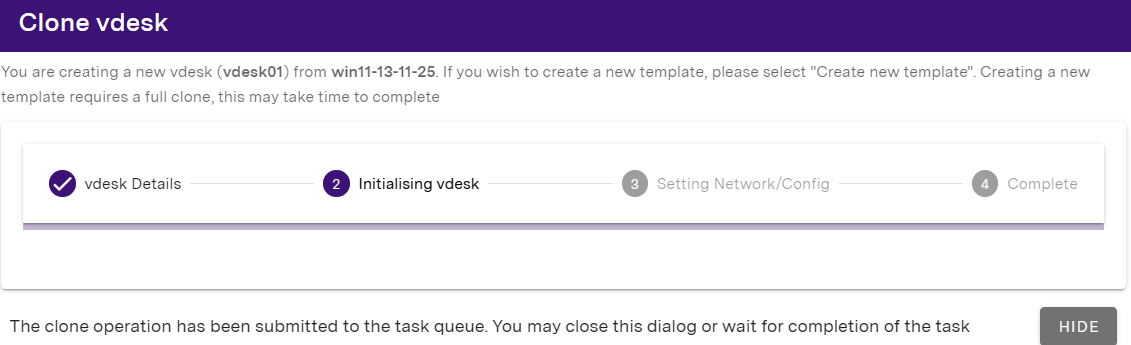
If you wish to create more vdesks concurrently: Hide the clone popup and start a new clone. These will queue in the background and complete in turn. Each clone will usually take 2 - 3 minutes to generate.
To delete a vdesk (or template) click on the Delete this vdesk button. (You cannot reverse this action).

If a template has linked vdesks you will not be able to delete it, and it will show with the locked chain link icon. All linked vdesks need to be deleted before this template can be removed.

A vdesk using Parsec must have an assigned GPU, an assigned user, and the Access Method set to “Parsec” before it can be accessed.
To assign a user to a vdesk, click on the Access Control icon then select a User from the dropdown box in the pop up User Selection window. If the relevant User does not yet exist, you will need to create them (see below). The vdesk will then be accessible to the relevant user via the Inevidesk Desktop Client as well as any administrators.
Vdesk hostnames cannot be changed (including from within Windows) after they have been created. They must be recreated with the correct hostname if required.
GPU allocation
The admin portal allows you to assign multiple GPUs per vdesk.
To assign additional GPUs to a specific vdesk, open the vdesk Config/Control menu and select the GPUs you want to add from the "Select GPU(s)" dropdown menu.
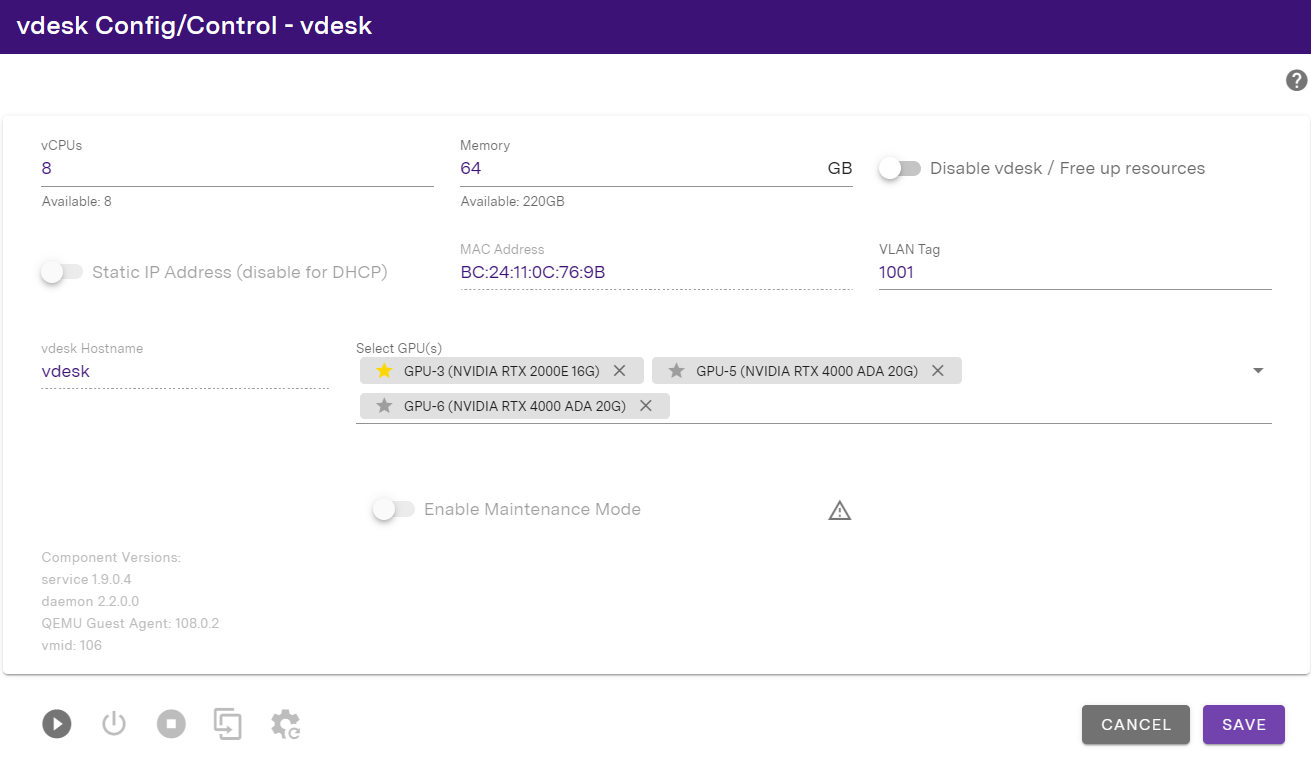
You can toggle the star icon below to set any of the options as the primary GPU for the vdesk.

Please note that only unassigned GPUs will be shown as available to add to any given vdesk, and that at least one of the GPUs must be set as the primary.

Click Save once done and wait for the GPU assignment task to complete before starting the vdesk.
vCPU and RAM allocation
The portal allows admins to reduce the amount of vCPU and RAM of a vdesk to free up additional resources for other vdesks.
To do this first shut down the vdesk that you will be removing the resources from. Once the vdesk is off, access its Config / Control panel then decrement the vCPU and Memory inputs to free up its resources for other vdesks.
Please note this feature is only available on dedicated Pods and vdesks. It is not available with flexidesks.
The panel will also indicate the amount of spare resources that are available to boost any existing vdesk.
To add the spare resources to another vdesk, first power it off then access its Config/Control panel. You will now be able to add the vCPU or RAM you removed from the other machine.
You can also fully disable a vdesk and free up all of its vCPU and RAM resources. To do this toggle the “Disable vdesk / Free up resources” slider within the panel.

The following icon indicates a disabled vdesk once the above option has been toggled:

flexidesk creation / deletion
Inevidesk now allows you to scale by the individual vdesk on monthly or annual commitment to cater for changing resource requirements.
Please note that with flexidesk you will only be shown the specs which you have purchased licences for.
You may also see multiple templates with the same name under flexidesks if your flexidesks span more than 1 Pod as the templates are replicated across your flexidesk pods.
Flexidesk template storage is limited to 200G so please delete any unused templates. If there is insufficient space available, further clones may be prevented.
To create a flexidesk, navigate to the Pods menu and click on the Add flexidesk icon shown below:

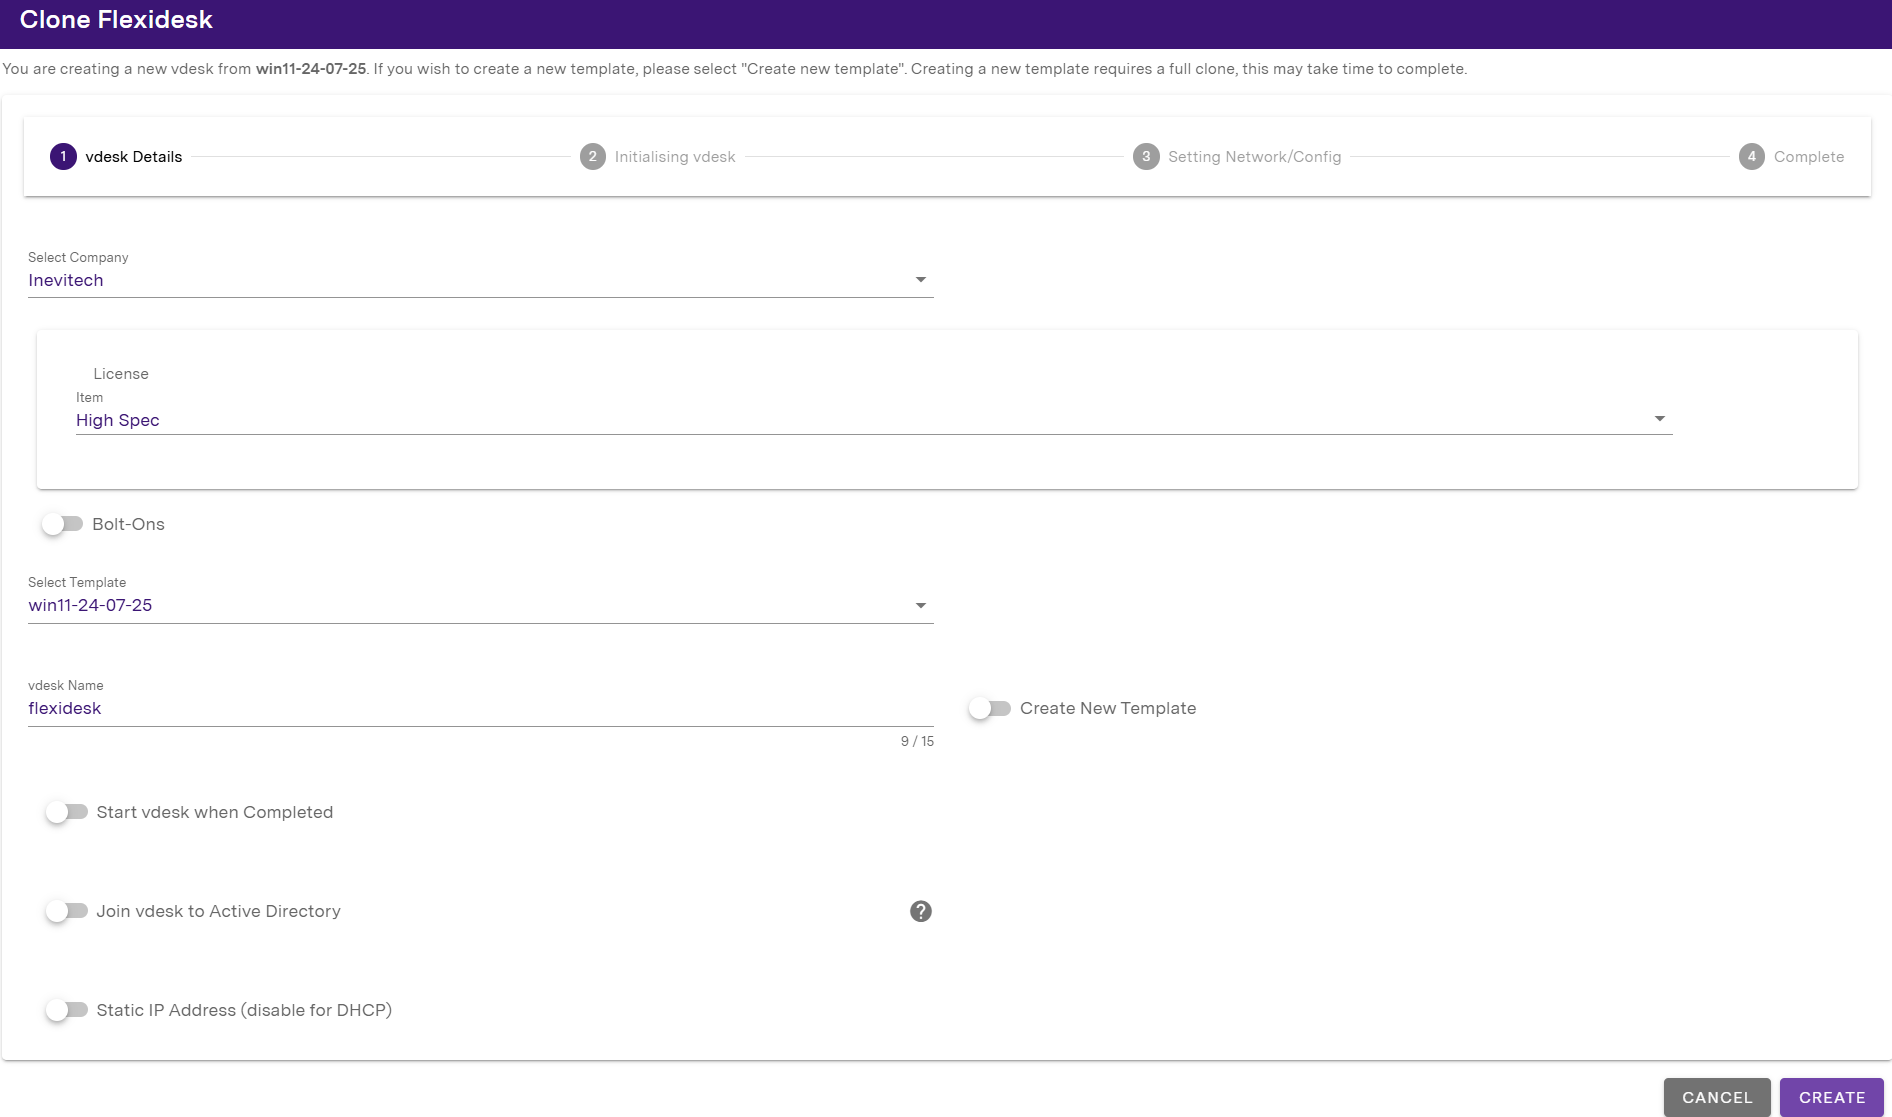
In the flexidesk creation menu, select the spec (Mid or High) that you wish to deploy and the template you would like to use.
Click “Create” once done to initialise the flexidesk.
Once successfully initialised, you’ll be able to see your flexidesk in the display table.
Select the flexidesk and click on the start button in vdesk Config / Control to power on and begin using the virtual desktop.
Bolt-ons: additional resources for flexidesks
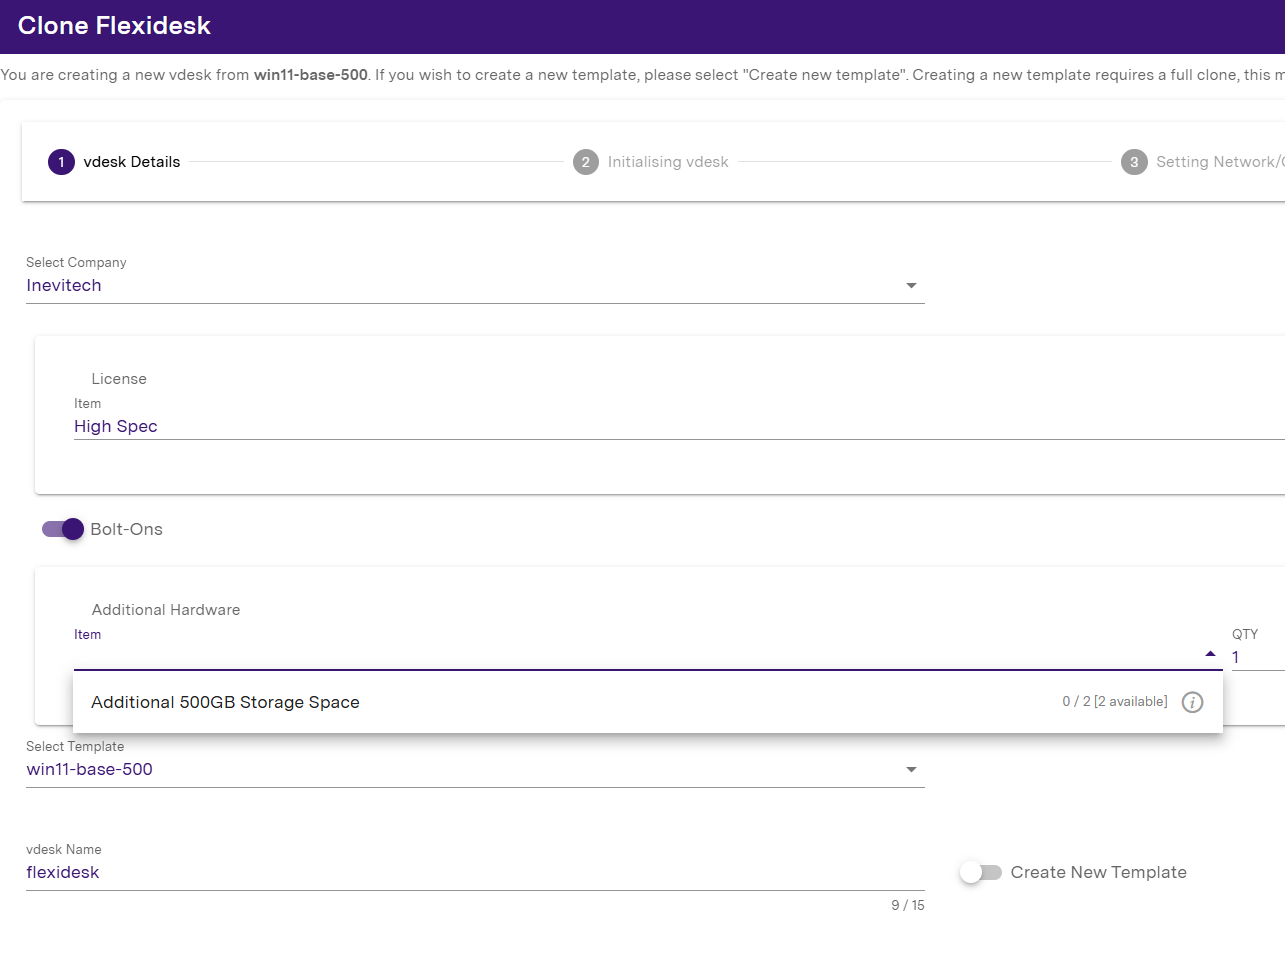
If you've purchased additional CPU, RAM or SSD resources you can use the following view to enable and add these to your flexidesk.
Toggle the Bolt-Ons slider within the flexidesk's Config/Control panel and click on the Additional Hardware dropdown. This will display all the available resources for that flexidesk.
Please note that storage cannot be removed/decreased once added. You can remove/decrease extra CPU and memory as needed.
Toggle views
You can filter the view to show only regular Pods and vdesks, only flexidesks or both using the infinity icon at the top of your Pod Management display.
Click the icon to toggle between views:

- Shows both regular pods / vdesks and flexidesks
- Shows regular pods / vdesks only
- Shows flexidesks only
The laptop icon next to the toggle view button indicates the total number of initialised vdesks (top number) and flexidesks (bottom number).
Pooled vdesks
This functionality is available to users using the Parsec and RDP connection methods.
Pooled vdesks can be logged in to by any user in the company or from an assigned group. They are designed for short term use, and will be restarted after a set (configurable) time period once the user has disconnected and returned the vdesk to the pool.
To designate a vdesk as a Pooled vdesk, start by clicking on Access Control and adding an access method. You can do so by toggling Enable Remote Desktop or by adding Parsec under Access Methods if you are a Parsec customer.
Scroll down and click on the Pooled vdesk toggle.

Use Pooled vdesk Timeout to set the timeout for when the vdesk will be released back into the pool on user logout.
The Force Release slider can be used to quickly release the vdesk back into the pool (takes approx. 1 minute) if needed.
NOTE: this action will disconnect any connected user and power cycle the vdesk before release.
You can restrict access to Pooled vdesks by enabling a specific group of users to access these.
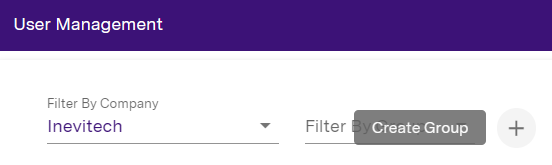
Groups can be created via the Create Group button available in User Management:
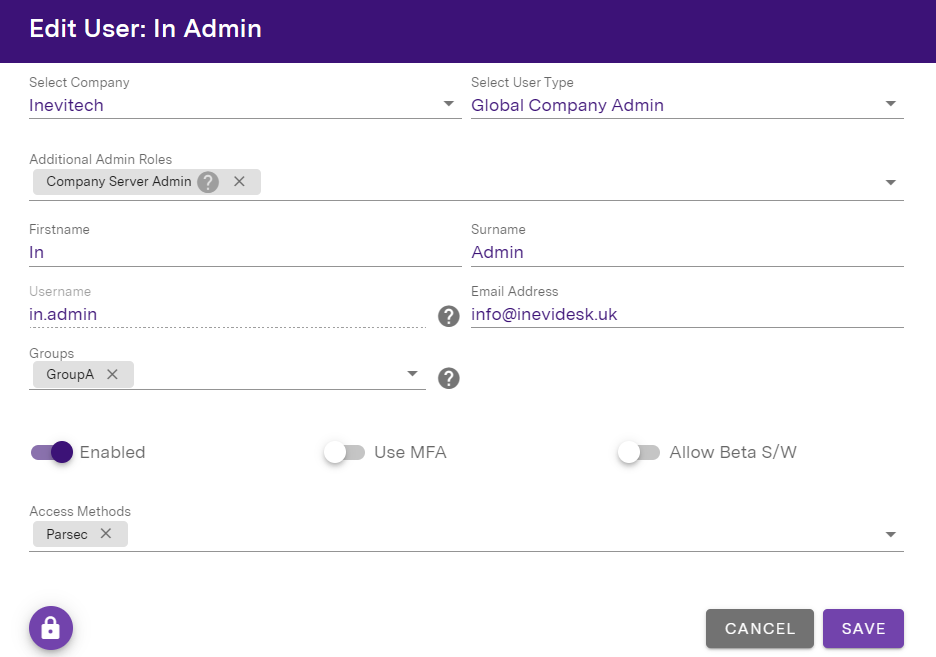
And then applied to the relevant users:
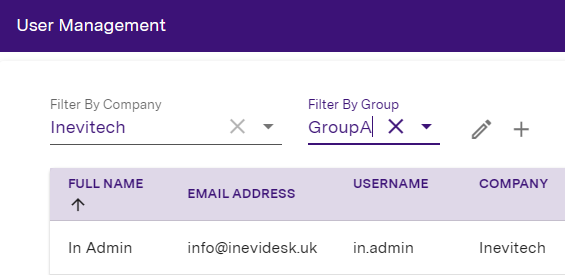
The admin portal also provides an easy way to add users to groups in bulk.
To start, navigate to the Users menu item, click the Filter By Group dropdown menu and select the group you want to add users to.
Click the icon to open up the Edit Group menu:
In the Edit Group menu, click the Select Users dropdown to begin adding users in bulk:
Template replication
To copy a template to another pod, click on the Replicate template button

Once selected you will be able to choose the pod to replicate to, and what to call the template on the other pod (otherwise defaulting to the current template name).
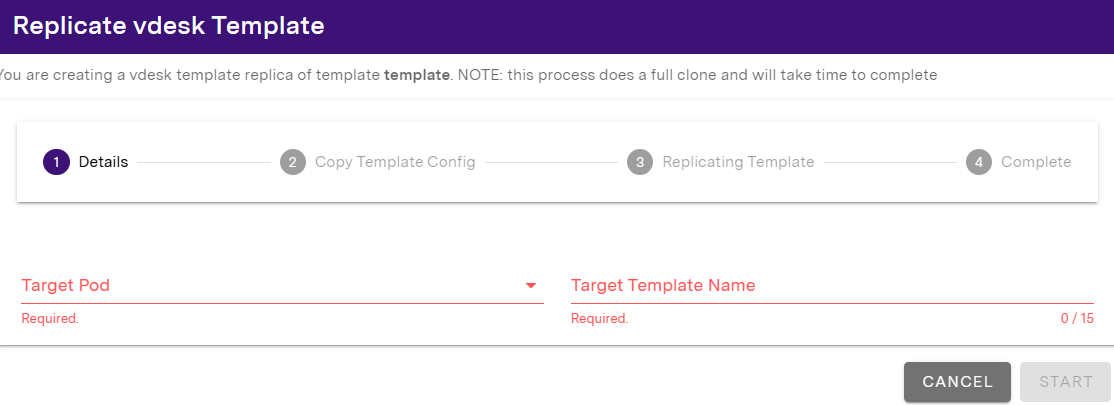
Please note you can only replicate templates to other pods within the same site.
vdesk power control
vdesks can be started and stopped via the portal. Click on any vdesk to bring up the settings window and at the bottom of this window you will find the following icons:

- start
- graceful shutdown
- hard stop
A hard stop should only be used if a vdesk is frozen and cannot be shutdown gracefully.
The vdesk icons in the pod dropdown are colour coded to let you know their status:
- vdesk is running
- vdesk is booting or shutting down
- vdesk is stopped
The vdesk icon will also show you when a user, or multiple users are connected:
![]()
A running vdesk may occasionally show the following alert icon
This may show for a brief time when a vdesk is booted but should usually disappear.
If the vdesk isn't running and the icon doesn't disappear within 5 minutes please check if you can access Windows on the vdesk in Maintenance mode.
If the vdesk is running and the icon doesn't disappear, it means the vdesk is not checking in to the portal. Please check outbound network, connectivity and firewall rules. If the problem persists despite no issues with the aforementioned you can force update the vdesk host components from the vdesk config/control menu.
It is best practice to shutdown vdesks when not in use. This allows a full restart and refresh of the vdesk (as opposed to a reboot) which will help keep it running at its optimum level. You can see a vdesk’s uptime in the portal (see below), which will show you how long since the last shutdown. We recommend a monthly shutdown at minimum. It’s also more sustainable practice to shutdown vdesks when not in use.
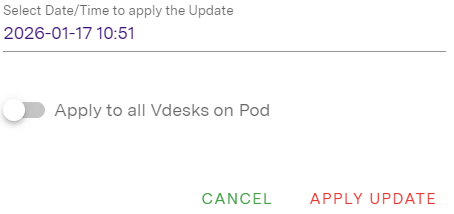
vdesk updates
You'll see the following icon on a vdesk when Inevidesk host updates are available for download.
Clicking the icon will allow you to schedule when the update will be applied to the vdesk. The user may get temporarily disconnected while the update runs depending on how they connect to their vdesk.
You can also set the update to deploy to all vdesks on that pod at the same time.